2018年6月13日星期三

Assessment 3:Critical reflaction

Assignment 3: Critical reflection

Overview reflection:

After a whole semester's study on BEIL0014 Digital Making, i got full experience on modern craft technique. It can take use on 3D laser printer to design original product model during production. English wheel has overturned my impression on planishing, in my first thought, only point hammer can make the object some curve and rub it with sand paper to do surface finishing, though mallet's effect in the progress is still vital. Besides, some supplement devices is also play great role when producing, the more suitable tools or device you choose in appropriate condition, the ideal result is quick to reach and so that less time it required. The tray i made can strongly prove it, which make me learn most from the course, it is also the reason why i choose it to review.

For the cross discipline feature it claimed, what you gain from other discipline is important. During the communicate and co-operation with most architect and industrial design mates, they usually generate flexible and suitable method base on different condition rather than traditional method. Even use old way there is always some new attempt or improve on it. It is cool actually, because my discipline is construction management, which is more concentrate on the paper work and usually reference for the article which is most reputation, in this progress i always mistake on whether it is fit on my topic and ignore the effect of demonstration during the project. It is the main spirit i learn from the workshop. And for the technique, maybe the edit skill on 3D laser printer might help me much more in future career. When i really want to present some property to the client, with reasonable time and energy, it is possible to bring the imagine site from visual to reality, which might offer a good evidence for describe and introduce the solid property to the clients and shareholders.

Review project: The Tray

Key Process:
1.Collect the key material-2 aluminium plates and 2 timber rectangle mould
2.Rub out the angle of the timber mould to smooth and with specific radian under standard
3.Place mark on the aluminium plate used to build up the border of tray  
4.Use the modified mould to mark out the 4 angle of aluminium plates and cut out the sharp part and like the mould
5.Fix 2 moulds and a marked plate together like burger on the specific device, and try to smash it and make it as vertical as possible the the plate[IMPORTANT]
6.Cut the redundant part of the corner and planishing in order to make 2 aluminium tray combine perfectly
7.Smooth it with sand paper and Brasso

Compared with last 2 project, this project produce more difficulty on understand of conductivity, shrinkage and the smash accuracy on the material. Conclude the failure experience, i  fixed it on the table with 2 fixators, because there is only 2 reasonable fixed device can be applied and there is whole class waiting to use. This method is exposed to many problem when i shaped the tray. 2 single phases can not keep the burger much stable in ideal, and it can only offer one surface to me to work, many loose and tight fixator movement required, which caused it is so easier to make the wrong smash and reduce the quality and the efficiency. As result, i was failed on 2 material.

Compare to first time i attempt, it offer a much comfortable experience on smash work but still have difficulty. Despite of making the border of the sides, the shaping on corner is most difficult part in this project. Whether it begin from the length side or the wide side, the other side will be influenced. It is required to offer equal pressure to each side, once put more strength at one side, the other side will produce a small gap, and this gap might really affect the overall performance of the project. Besides, after hammer, there is a little glitch that it is quite hard to get your tray out of the mould, i finally pry it out but it make a bit shape change, and i try my best to overcome this shortcoming but it still looks not much pretty. And aim to enhance the finish effect, i choose to use sand paper and Brasso to make it more smooth.
The correct method: fix device

Finished mould after rubbing

The 'burger'
Try to combine them

First fail work
Second attempt with new method
Mark on the plate and cut off angle


Taped them together better to be rubbed

Image result for sand paper
Sand paper for finishing work


Image result for Brasso
Brasso for finishing work

2018年5月23日星期三

Assessment 2: 1:1 Fuel Tank

BEIL0014 Assessment 2: 1:1 Fuel Tank

Team up with:
Xujie Feng(Jay) z5042594
Yuqing Wu(Maggie) z5027269 


Key Procedures:

1.Edit the digital fuel tank template on software(Rhino)
2.Import the template data to 3D laser cutting machine and produce a timber model for reference
3.Use tape to enhance the strength of the model)
4.Discuss and divide it into 3 parts (Top, left side and right side) and attached paper to cover the surface, aim at fulfilling it and form faces from edge and scale out the aluminum material needed
5.Edit the plate and try to fit the shape on the paper
6.Use tools in workshop and shaping the parts divided
7.Combine the other 2 pieces make by team mates with glue or tape


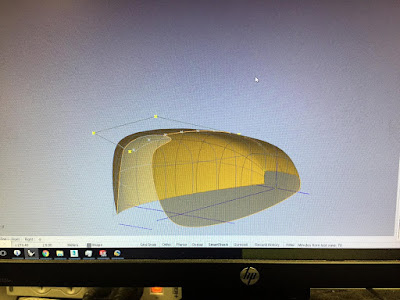
Step 1: With some favor and hints from Russel, our group mate Jay successful produce a 3D motor fuel tank through Rhino and transfer it into the subdivision mode, which make the model like coming cross faces from vertical and horizon,  who has learnt the technique through the tutorial video from You tube, and discuss with the group.

Picture 1: A useful and practical modelling software
Picture 2: The outline appearance in Rhino

Picture 3: The preparation template for 3D laser cutting


Step 2: At this stage we are going to import the template model into 3D laser cutting machine with Ply Basswood with 3.0mm thickness, which we think it is more strengthen compared with simple Ply wood.  Refer to other groups experience, there is always have problem with the thickness of the slot. If too tight, it can insert 1 to 3 pieces and then because the expansion property, the rest of piece will be too narrow to insert. Another hand, if it is loose then the combined majority will be less strength and the piece slip out will frequently occurred which might cause extra troubles. For this problem, after 2 times test cut, we finally found out a comfortable thickness.

After we produce it successful, there is new issues raised. The middle and top side which connect with left and right wings is too thin and possible for crack. For this situation, we decide to remove the exist figures marked on the timber piece and try to expand the thickness of the neck of our model and enhance the strength. In addition, we have cut 3 more pieces of this section for insurance the improved one crack. And finally we cost 1 of them during the proofread procedures.

Picture 4: Processing laser cutting

Picture 5 & 6: Different perspective for finish timber fuel tank model

Step 3: At this stage we are going to use tape to cover over it(expect the bottom) like a 'mummy'. This process is so important that this model now is consist of vertex and the edge, the faces of it is still void. And we use tape, despite of the stickiness, the tension it own is much more flexible. The stickiness from start and to the end binding tight with the model and offer it faces and more strength, because the viscidity of tape. With the fully tight binding, the compression take place on the model and make it more strength. Although it cost much tape in the workshop, from the result, it might be worth.

Picture 6 & 7: Different view for the tape cover the model


Step 4: After discussion we decided to divided it into 3 parts with about proportion in order to make the separation much fair and make sense. So we are try to use paper to cover it and separate it, the paper process means that the fuel tank is full of curve side and smooth, we can not measure it with simple ruler but through some media things. For the paper cover, we implied a little techniques that at the most curve sides it is required to cut the paper slide by slide and attached with yellow tape, this way can let the connection of curve much loose, which reduce the measure error for scale the aluminum material.

Picture 8: After paper cover model overview

Picture 9: Side paper scale sample (Left)

Step 5: At this stage, we have made the paper scale sample and need to use it on the aluminum material. Grab the aluminum board and cut it into roughly rectangle. Then we put the sample above the cut rectangle and try to outline a shape with mark pen. There is a notice that it is always remind to leave extra space for the project. Because the extra can be adjust or cut off, if there is too small, it is not likely to weld to fulfill the defect. 

Picture 10: Mark and scale out the detailed aluminum side part
 

Picture 11: Raw aluminum left side part of the project


Step 6: This part will test the most skill we learnt from half semester. Because it is a irregular appearance. Some large mark i decide to pass through and try to maintain the clean surface of the product. At first, i try to make it a bit curve aim at cover the model through hammering the curve edge as a line but not a single point just like the theory of joint of skeleton. It looks like some joint line that make the product cover the wing of model. This part have cost me about 40 minutes for adjust and repair. Then the point is the top side which is need to combine with the Top one. Thus i am plan to hammer the top side of my part and make it a bit shape change to warm up for the shrinkage machine. If using the shrinkage for the flat condition, which is possible for the crack, which really damage the surface performance. After the top side shrinkage, it is ready for English wheel to make some planishing. But need to remind that the wrong pick for the degree of English wheel might cause some degree of shape change for the main product, it required some attempt. Finally try to make the balance of the top side curve and maintain the product can cover the model, it is time to cut out the extra part to reach beautiful match and combination with group members.


Picture 12 & 13: Shrinkage for the top side area and the performance

Picture 14: Failure on cover the model

Picture 15: After repair for the wrong bend

Picture 16: Cutting off redundant area


Picture 17-19: Some left side parts finished version


Step 7: Combine with other 2 pieces with group mates, top from Jay and the right side from Maggie. In order to enhance the effect and over all appearance and performance, at the inner side of the product we have attached the tape and make it more close and match.

Picture 20-22: Some finished combined work with group mates


2018年4月18日星期三

Assessment 1 The Blister

The Blister

Key process:
1.Collect the twin mould, aluminium material, 4 group of  screw
2.Produce a custom awl tool
3.Fix the aluminium plate with mould also like burger and make some curve and form a blister
4.Repeat smash and track whether the belly of the blister is satiation
5.Cut it out and remove all redundant part, and polish it.

At this project, the feature is supposed to be let us understand that we need to adjust and create tools to match the goal we need. There is about 30 different types of mould, the main difference is the top of the blister, most of them can not allow for typical mallet or hammer to go through it. Thus, it is required us to make intermediary and make it shape change. And the awl size is base on different condition, which is determined by the mould collected from the tutors.

During the cut on the aluminium plate, i got some ideas. Most people is make the size which nearly perfectly match the mould, and attached them like burger and drill the hole pass through the plate. It is offer more stable during knocking work but increase the stress at the calibration stage. Each time you want to see the outline of the blister, you need to pull out all 4 screws out, which is not much convenient. My way is remove two part which is needed to plug screws for  originally. Base on apply the fixator, it is less stable than the drilled one but is still enough to go ahead. Then, it is convenient for maker to check whether there is any mistake frequently.

Some finished images:

Tools during the progress:
Customize awl( Top view)
Customize awl( Front View)

Actual use of the awl

The idea of the plate cutting and mould set up
The fixator

Assessment 1 The Tray

The Tray

Key Process:
1.Collect the key material-2 aluminium plates and 2 timber rectangle mould
2.Rub out the angle of the timber mould to smooth and with specific radian under standard
3.Place mark on the aluminium plate used to build up the border of tray  
4.Use the modified mould to mark out the 4 angle of aluminium plates and cut out the sharp part and like the mould
5.Fix 2 moulds and a marked plate together like burger on the specific device, and try to smash it and make it as vertical as possible the the plate[IMPORTANT]
6.Cut the redundant part of the corner and planishing in order to make 2 aluminium tray combine perfectly

Compared with last 2 project, this project produce more difficulty on understand of conductivity, shrinkage and the smash accuracy on the material. During step 5, i am not follow it at the beginning, what my method is try to fix it on the table with 2 fixator, because there is only 2 reasonable fixed device can be applied and there is whole class waiting to use. This method is exposed to many problem when i shaped the tray. 2 single phases can not keep the burger much stable in ideal, and it can only offer one surface to me to work, many loose and tight fixator movement required, which caused it is so easier to make the wrong smash and reduce the quality and the efficiency. As result, i was failed on 2 material.

After correct the method  by using the fix device, it offer a much comfortable experience on smash work but still have difficulty. Despite of making the border of the sides, the shaping on corner is most difficult part in this project. Whether it begin from the length side or the wide side, the other side will be influenced. It is required to offer equal pressure to each side, once put more strength at one side, the other side will produce a small gap, and this gap might really affect the overall performance of the project. Besides, after knocking, there is a little glitch that it is quite hard to get your tray out of the mould, i finally pry it out but it make a bit shape change, and i try my best to overcome this shortcoming but it still looks not much pretty.
The correct method: fix device

Finished mould after rubbing

The 'burger'
Try to combine them


Mark on the plate and cut off angle


Taped them together better to be rubbed

Assessment 1 The Torus

The Torus:

Key process:
1.Get an aluminium plate
2.Make mark vertical to the wide of the plate
3.Place it on the stump or english wheel to make main body shape change
4.Use the squeezing machine or smash the edge of length side to make it curve convert to the main body
5.Try to make the surface clean and smooth

Just head to some difficult points, at this project, adjust the main body to curve is simple but when shaping the edge of the length, it is so easy to affect the remain shape of the main body. Therefore, compare with using mallet and fix cyclinder mould to make the curve, it is suggest to apply squeezing device to deal with the edge of length, though it might increase the difficulty on smooth work because it left lot of nob mark on the material. For the smooth work, using english wheel to roll the main body might be a good idea, but for the side curve, it is still better to use the cyclinder mould to sharp it.

Some finished images for project:


Some tools mention in the description:

Fix squeezing device(open and collect the material)
Fix squeezing device(squeezing)
Stump

English Wheel